Turning Image Corruption into Art
Published • 7 min read • more posts
You might have heard of the recent “Replicate Image” trend. It reminded me of something I used to do when I was younger. When I was bored, or had some sort of exam tomorrow, I would open a JPEG in TextEdit and delete random binary data to see how it would corrupt the image. It turns out that modern image formats are quite malleable, and more often than not, you would still end up with a decodable image! Definitely a little geeky, but hear me out, it was a surprisingly fun way to waste time pointing out the bizarre image artifacts. As you may have guessed, I was spontaneously motivated to turn this into its own “Replicate Image” project.
The gist: I would write a program that would randomly tweak a few bytes of an image a thousand times over. Then, I would compile every image into a video of the process from start to finish, and do this many times for different image formats. Let’s get to it.
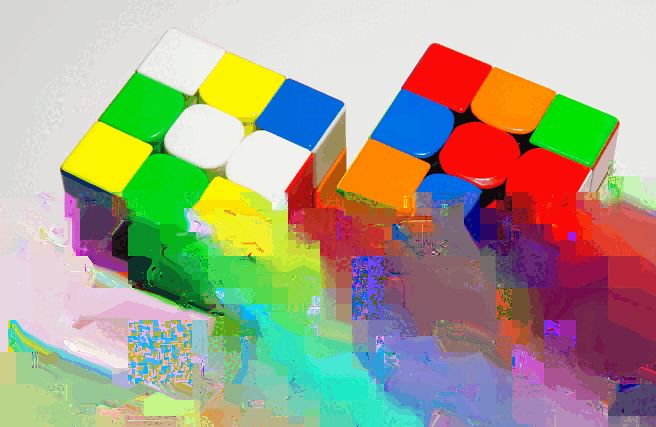
First, I needed a target image to work with, ideally something with interesting color variety. My close friend Adrian snapped this cool picture demonstrating the concept of symmetry on the Rubik’s Cube.

Perfect! Now, a simple Python script to perform our byte-hacking does the trick, using ffmpeg to perform some error checking.
image_corrupt.py
import argparse
import sys
import subprocess
import random
from pathlib import Path

COUNT = 1000

parser = argparse.ArgumentParser(description="Corrupt an image file.")
parser.add_argument(
    "image_file",
    type=str,
    help="The image file to corrupt"
)

args = parser.parse_args()
file = Path(args.image_file)
base = file.stem
ext = file.suffix[1:]
if not ext:
    print("image_corrupt.py: Please provide an image file with an extension.")
    sys.exit(1)
if not file.exists():
    print(f"image_corrupt.py: File {file} does not exist.")
    sys.exit(1)

with open(f"{base}.{ext}", "rb") as f:
    data = bytearray(f.read())

subprocess.run(["mkdir", "-p", f"{ext}s"])

for i in range(COUNT):
    while True:
        olddata = data[:]
        # The beginning has important metadata
        pos = random.randint(100, len(data) - 1)
        # I didn't have luck *deleting* bytes, as the image
        # quickly became unrecoverably corrupted. I found success
        # in just incrementing each randomly selected byte
        data[pos] = (data[pos] + 1) % 256
        with open(f"{ext}s/{i:04}.{ext}", "wb") as f:
            f.write(data)
        if (
            subprocess.run(
                [
                    "ffmpeg",
                    "-v",
                    "error",
                    "-i",
                    f"{ext}s/{i:04}.{ext}",
                    "-f",
                    "null",
                    "-",
                ],
                stderr=subprocess.DEVNULL,
            ).returncode
            == 0
        ):
            break
        data = olddata
I converted Adrian’s picture to JPEG, PNG, WEBP, and AVIF and ran my script to generate the images. So far, the results looked extremely promising.
To convert the images to a video, I experimented with two different methods. First, a simple Google search demonstrates directly using ffmpeg like so.
image_corrupt.sh
#!/bin/bash

# The image extension
ext=...
# The image base name
base=...

# Assume the generated images are in "${ext}s"
cd "${ext}s"
# If ffmpeg doesn't glob-match properly, follow this
# https://stackoverflow.com/a/64407890/12230735
ffmpeg -framerate 30 -pattern_type glob -i "*.$ext" -c:v libx264 -pix_fmt yuv420p -vf "pad=ceil(iw/2)*2:ceil(ih/2)*2" "$base".mp4
echo
echo Done! Generated "$base".mp4 in the directory "${ext}s".
However, most of my experimentation with this approach was uninteresting. ffmpeg conservatively repairs each image fed as input when converting to video. The files were apparently so viscerally mangled that ffmpeg deems the whole operation unworthy and just gives up.

Alternatively, you could first use ImageMagick to convert the images to a GIF and then use ffmpeg to convert that GIF to a video. Yes, this was literally the only intermediary step I could get working. The plan isn’t entirely foolproof. Despite the error checking from ffmpeg, some of the generated images were still invalid. I figured out that re-feeding each image one-by-one into ffmpeg repaired them enough to shut up ImageMagick’s complaints without compromising the image data. Thanks kind strangers. I love the Internet!
image_corrupt.sh
#!/bin/bash

# The image extension
ext=...
# The image base name
base=...

# Assume the generated images are in "${ext}s"
cd "${ext}s"
# Use parallel processing if `parallel` is installed
if command -v parallel &> /dev/null; then
    # Functionally identical to the `else` branch
    parallel --progress --eta ffmpeg -y -i {} _{} ::: *."$ext"
    for file in [!_]*."$ext"; do
        mv "_$file" "$file"
    done
else
    for file in *."$ext"; do
        ffmpeg -y -i "$file" "_$file"
        mv "_$file" "$file"
    done
fi
# I had to resort to ImageMagick's deprecated `convert` program because
# ImageMagick would sometimes crash more than half way through without
# generating the GIF. The old version handled this correctly, and I
# couldn't figure out how to make the current version do this.
magick convert -limit memory 100000 ./*."$ext" "$base".gif
ffmpeg -itsscale 0.2 -i "$base".gif -movflags faststart -pix_fmt yuv420p -vf "scale=trunc(iw/2)*2:trunc(ih/2)*2" "$base".mp4
echo
echo Done! Generated "$base".gif and "$base".mp4 in the directory "${ext}s".
Most of what you’re about to see was produced by this cursed workaround. Compared to ffmpeg, ImageMagick was far less pedantic about repairing images, so the results turned out more visually interesting.
With everything in hand, off to the races! First up, PNG.
PNGs were the hardest to corrupt. Each image iteration took a few dozen attempts before finding a byte that could be changed while still passing the error checking mechanism. Intuitively, this makes sense. PNG is a lossless format from 1995, when data corruption was endemic and most small companies had their connectivity through flaky phone lines. So, the PNG designers put a strong emphasis on data integrity, making every image chunk include a cycle redundancy check (CRC), and adding even more checks for more important image chunks. What you’re seeing is probably just ffmpeg trying its best to recover from malformed CRCs.
Additionally, I got this one work. Some more techno spaghettio.
Next up, JPEG.
I was really excited to be able to make out block splitting and the discrete cosine transform. This is the stuff I live for! Unlike every other format, I was only able to make this interesting by skipping the repair phase with ffmpeg and directly feeding each image to ImageMagick. Even though ImageMagick was operating on raw, corrupted JPEGs, it was still able to recognize three-fourths of the generated images before crashing. A quick look at JPEG’s syntax and structure corroborates that its only form of data integrity is sparse “restart markers” that don’t seem to have much effect. Honestly, JPEG data corruption is itself a whole other topic worth investigating. See the JPEG editor on this excellent blog.
Up again, WEBP.
It’s not quite static noise, and it’s not quite order either. It’s like you’re trying to remember something, but you can only see a blurry mess of pixels. There is more detail than meets the eye; you could pause at any timestamp and land on a novel expression of color. On the technical side, WEBP worked without issue and was well-behaved. I don’t have much else to say, so let’s finally move on to AVIF.
This took me many tries to get right. It’s my favorite one, and it’s incredibly mesmerizing!
I asked my friend Matthew to give me another image to corrupt with the AVIF format. This was the highest quality video I could produce before ImageMagick ran out of memory. The result also ended up being awesome!
I’ve written some goofy blog posts before, but this one takes the cake for how much fun I working on it. I have made the source code public so you can try corrupting your own images. Do let me know how it goes. Until next time!
↑ Scroll to top ↑